
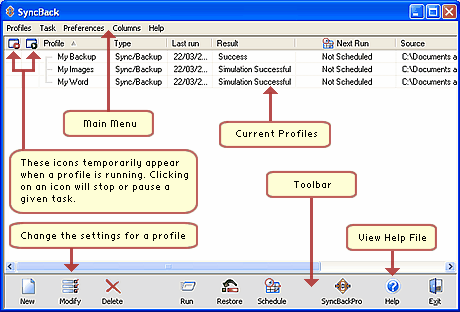
SyncBack is designed to be simple to use. All the essential tasks can be carried out from the main window by clicking an icon on the lower toolbar. SyncBack also has a main menu that provides easy access to all it's functions, and a right click pop-up menu that is available when a profile is highlighted.
Profile Types
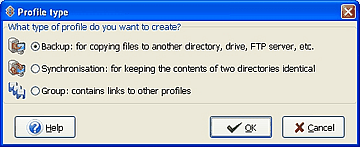
Choose a Backup profile when you want to backup (copy) your new and modified files to another place, e.g. an external hard drive or an FTP server.
Choose a synchronisation profile when you have two directories in which files are changing and you want them both to contain the same files. For example, you may have a directory on your computer containing documents you are working on. A colleague may also be working on documents on his computer. If you want to copy his new and modified files to your local directory, and copy your new and modified files to his directory, then you need to use a synchronisation profile.
Note that the term synchronisation is also called Mirroring by some programs.
Choose a Group profile when you want to create a profile that contains other Backup or synchronisation profiles. This allows you to run many profiles at once.
So what is the difference between a Backup and a synchronisation? A backup copies files in one direction: from the source to the destination. A synchronisation copies files in both directions: from the source to the destination, and from the destination to the source.
![]() Creating Profiles
Creating Profiles
When SyncBack is first launched a dialogue window opens asking you whether you would like to create a profile. A profile stores information about the folders or files you would like to backup or synchronize using SyncBack. Once you've created a profile you'll be able to click a single button on the toolbar to carry out a specified task in the future.
You may create a profile at any time by using the 'New' button on the lower menu, or selecting 'New' from the 'Profiles' main menu located at the top of the program window. When you first run SyncBack a window titled 'Confirm' with the following dialogue text will appear:
You do not have any profiles, would you like to create one now?
Agree by clicking the 'Yes' button. A second window opens asking what kind of profile you would like to create:
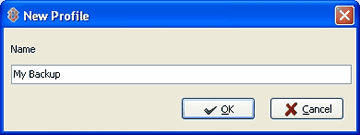
Enter a name for your new Profile:
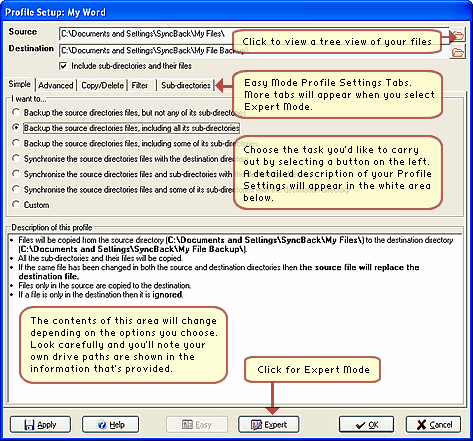
You'll then enter the source and destination paths of the folders you'd like to backup or synchronize in the top-most fields of the Profile Setup window. You can select your files quickly by clicking the folder icon and by browsing the tree explorer to the folder or file you want to carry out the task on. To view more advanced options click the 'Expert Mode' button on the lower menu bar.
Notice how more settings tabs become available:

Carefully check the default options meet your needs then click OK.
A window dialogue opens asking whether you would like to carry out a 'Simulated Run':
Would you like to perform a simulated run for this new profile? A simulated run does not copy or delete any files, but does produce a report on what would have been copied or deleted.
This allows you to check the profile functions correctly without actually copying any files. As you click OK the 'Simulated Run' begins.
SyncBack processes files very quickly so if you're only backing up or synchronising a few files you'll not view the progress of the run signified by a flashing Profile icon situated on the top left under the menu item 'Profiles'.
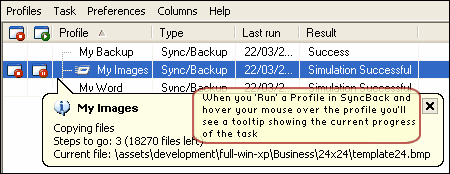
Note the new icons in the screenshot below that temporarily appear to the left of the profile being processed.
Clicking on an icon will either stop or pause a given task. The task is signified by the third icon, in this case a 'run' icon that appears to the left of 'My Images'.
One of the most useful feedback mechanisms in SyncBack is to hover your mouse over a profile when a task is in progress (ensure your mouse pointer is under the 'Profile' column in the main window for this to function). A tooltip will appear with constantly updated information about: the type of operation; the steps to go; and the current files being processed:
As the profile is being processed an icon will also appear on the Windows Taskbar located on the bottom right of your screen:
![]()
SyncBackSE also features a new progress bar which appears at the base of the program window:

After the profile has been processed the main window will look slightly different as the temporary icons are no longer viewable. (if you chose not to create a profile this window would have opened next). From here you'll be able to carry out your main tasks of backing up and synchronising files:
You have now successfully created a simple backup profile. To create a Group Profile you'll need to create two profiles or more. You'll then have the opportunity of running these profiles as one. To find out more about this feature go to Creating a Group Profile.
All Contents: 2BrightSparks Pte Ltd © 2003-2006